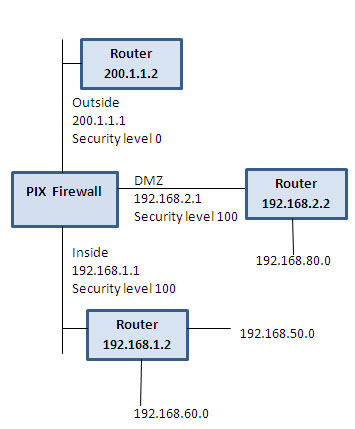
This post intends to familiarize you with some of the basics skills that you need to configure a PIX firewall. The configuration commands will help you to assign name to a PIX interface to configure routing and to configure network address translation including PAT(port address translation).
To erase configuration: write erase
To save configuration: write terminal
Interface name command
PIX(config)#name 192.168.1.1 proxy11
PIX(config)# name 192.168.2.1 PIX-outside
Interface configuration
Every interface in PIX firewall has its security value and name. Normally, the ethernet1 is names as inside interface with security value 100, whereas the ehtenet0 interface is considered outside with security value 0. Any interface other than ethernet0 and 1 are considered part of DMZ. Normally, the ethenet2 has a security value of 10.
PIX(config)#nameif Ethernet DMZ security 10
To disable interface:
PIX(config) interface ethernet0 shutdown
When you enable an interface in PIX you need to use the speed value.
PIX (confer) # interface ethernet0 auto
Assigning IP address to PIX interface:
PIX(confer)#nameif ethernet0 yellozone 20
PIX(config)#ip address yellowzone 20.1.1.1 255.255.255.0
Setting maximum transfer unit(MTU)
The MTU command help to set the maximum transfer unit of the layer2 frame. As you now that the default MTU for Ethernet frame is 1500 byte. When you encrypt and encapsulate traffic with IP Sec that pass through PIX, the total length of the frame exceed 1500 byte. Since Ethernet cannot transmit traffic more than 1500 byte in a frame, the encrypted frame is divided into two packets to match the MTU requirements of Ethernet- which is very inefficient transmission methods and increases latency. If you set the MTU size to 1400 byte then the encrypted packet will never be more than 1500 byte and will always be transmitted as a single packet.
PIX(config) # mtu 1400
Note: static access list commands are used to enable access to a higher security level from a lower security level. NAT and Global commands are used to enable access from a higher security level to a lower security level. That is why used internal host computer try to contact Internet they use NAT.
Configuring Network address translation (NAT)
The Nat command translate the inside network addresses or interfaces. It basically specifies a range of addresses that would be translated into global address. The global command sets the IP of global interfaces or outside interfaces which will be known to the outside world or Internet.
PIX(config)#Nat (inside) 1 60.10.10.0 255.255.255.0
PIX(config)#global (outside) 1 10.1.1.8-10.1.1.15
The command Nat inside 1 will translate the specified series of network address to the global address pool specified by the global command.1 is the Nat id which can range between 0 to 2 billion.
Use of static command
If any host computer from Internet or outside network want to connect to the host of an inside network then you can use the static command to set a static global address for an inside host which has a local IP. For instance, you have a server in the inside network with IP address of 60.10.10.2 and you want your customers from the outside network can access this server via the global address 10.1.1.17 of your network. You can configure this with the following command:
PIX(config)#static (inside, outside) 10.1.1.17 60.10.10.2
How to configure PIX Firewall for routing?
By specifying route information in PIX firewall you can send traffic to your desired destination. On each interface of PIX, you can configure more than one route. PIX firewall can listen to RIP traffic and can update its own routing traffic. You can also configure PIX for broadcasting its interfaces as a default route. If you want all the traffic pass through the interfaces of PIX, then broadcasting an interface as a default route is a good option. Before configuring a route on your PIX, it is a good practice to sketch all the interfaces of our firewalls with its IP address and the nearby network addresses. The following is an example of route configuration in PIX.
Route outside 0 0 200.1.1.2 1
The above statement will let pass any packets destined for the default route. The ‘1’ at the send of the statement means that the router ( 200.1.1.2) is just one hop away.
Route inside 192.168.50.0 255.255.255.0 192.168.1.2 1
Route inside 192.168.60.0 255.255.255.0 192.168.1.2 1
To pass traffic to the network 192.168.80.0 through the DMZ you need to add a static route in your PIX.
Route dmz1 192.168.80.0 255.255.255.0 192.168.2.2 1
NAT and PAT for outbound connectivity:
To let inside users to start connection to the lower security interfaces such as outside routers, use NAT
Nat inside 1 0 0
The “0 0” means any host with a netmask can use NAT to get connected with the outside routers. Instead of using “0 0 “ you can use host IP or network ID and network mask. The 1 after the interface inside specify the NAT id.
If any user (192.168.2.3), from the dmz1, want to use NAT then use the following command.
Nat dmz1 1 192.168.2.3 255.255.255.255
Now set a global IP on your outside interface
Nat (outside) 1 200.1.1.10 netmask 255.255.255.224
PIX will use the above statement to convert inside IP to a global IP. Here PIX will automatically implement PAT since all the inside users will use the same IP when the go to the outside world.
Configuring NAT between DMZ and inside
Global dmz1 192.168.2.10-192.168.2.100 netmask 255.255.255.0; this command allows the inside users to connect with the dmz1 interface.
Configuring dmz users to connect to the outside interface
Suppose there is a dmz1 user with IP 192.168.2.3 which want to get connected with the outside interface.
Nat dmz1 2 192.168.2.3 255.255.255.255
Global (outside) 2 200.1.1.20
The IP 200.1.1.20 is the global IP that the dmz1 user will use to connect to any outside interface users.
Some useful commands
Show cpu usage Show memory Show flashfs Show interface ethernet1 Show nameif Show ip Show access-list Show access-group

