To monitor SNMP(simple network management protocol) enabled cisco switches and routers in Zabbix server, you need to configure the server for SNMP. In this post, I have used a Debian 8 server running zabbix and setup SNMP in a cisco switch for monitoring its interfaces and bandwidth. The configuration will be in three parts. In the first step, we will install SNMP on the Debian server hosting the Zabbix. In the second step, we will configure the switch for snmp host information and community string. In the last step, we will configure a Zabbix host to poll SNMP data from the cisco switch.
Step 1: configure the zabbix server for SNMP
At first add the Debian source list if have not already done so.
# nano /etc/apt/sources.list
Paste the following lines in the sources.list file:
deb http://httpredir.debian.org/debian jessie main contrib non-free
deb-src http://httpredir.debian.org/debian jessie main contrib non-free
deb http://httpredir.debian.org/debian jessie-updates main contrib non-free
deb-src http://httpredir.debian.org/debian jessie-updates main contrib non-free
Next, update your source list
# apt-get update
Install SNMP and MIB database. Run the following two commands to install the SNMP and the MIBS database.
# apt-get install snmp
# apt-get install snmp-mibs-downloader
Go to /etc/snmp/snmp.conf and uncomment to following line. This will allow the net-snmp command-line to use the MIBS.
mibs :
Next, update the MIBS to its latest version. Run the following command as root user.
# download-mibs
# /etc/init.d/snmpd restart
Next go to /etc/snmp/snmpd.conf and uncomment the line shown below. This will allow you to query the zabbix server using “public” community string.
rocommunity public localhost
Now, you can query your zabbix server with the help of “public” community string as shown below:
# snmpwalk -v1 -cpublic localhost
Restart the zabbix server.
service zabbix-server restart
Now, your zabbix server is ready for SNMP and you can move on to the second step of the configuration.
Step 2: configure snmp v1 in cisco switch.
To configure SNMP in your cisco switch, you need to create an access-list allowing access the SNMP manger(Zabbix server) to the switch. Next, you have to create a community string and give it a read only access(ro) followed by the access list number. Finally, you have to create snmp host ( zabbix server IP) followed by the community string.
switch(config)#access-list 10 permit 200.1.1.15
switch(config)#snmp-server community mycommunity ro 10
Switch (config) #snmp-server host 200.1.1.15 mycommunity
Note: 200.1.1.15 is the zabbix server’s IP.
Step 3: create the host information in zabbix.
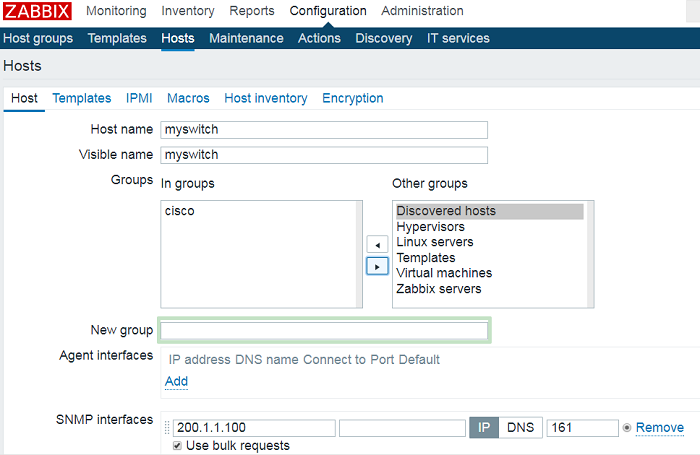
To create host information in the zabbix, logon to your zabbix with your admin user credentials and click on configuration and then click on “create host”.

Next, give a host name and visible name. Type your switch interface IP in the “SNMP interfaces” box and click on add button located at the bottom of the page.

Finally, you have to create a macro for the SNMP community string. In the Macro files, type {$SNMP_COMMUNITY} and in the value field type “mycommunity” and click on the update button. Remember that the string value must match that of the switch. In this example, we set the community string as “mycommunity”.

