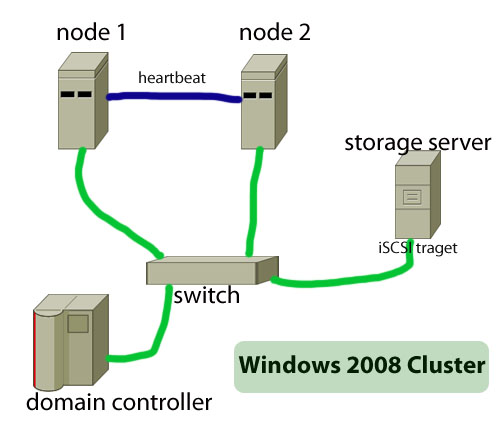
The main objective of a failover cluster is to ensure high availability of services. A failover cluster means that only one server–which is also known as active server–in the cluster will provide the service such as a file server or webserver. When this active server will go offline or will be out of service, another server in the cluster will provide the same service, without causing any service disruption. For instance, you have configured two windows 2008 servers in cluster mode to offer web service to your users. If, for any reason, the active server goes down, then the passive server will serve the webpages to your customers.
Note: all the servers participating in the cluster are also known as nodes.
The main steps to build a failover cluster are:
- Configure the nodes or servers for failover role.
- Configure the active directory
- configure the storage servers
Configuring cluster nodes or servers to participate in the failover cluster.
For example, you want to make your cluster with two windows 2008 servers. At first, you need to make sure that both the servers are part of same domain. It is recommended to configure your cluster nodes as a member server in the domain. Once you finish joining all the servers in the domain, create a cluster admin account in the domain controller using active directory. For instance, name this account as “clusteradmin”. Next, log on to your nodes as the local administrator, and join the newly created user ‘clusteradmin’ in the local admin groups that node. To add clusteradmin in the local administrator group, you need to open the server manager and then click on ‘configuration’. Next, click on groups under ‘local users’. Finally, click on administrator and type the cluster admin user name that you created in the active directory.
Remember to allow this clusteradmin user the permission to “create computer object” and “read all properties”. Similarly, add that clusteradmin account in all the nodes that will be part of the cluster. Once you are finished with creating all the necessary users accounts, you have to set up the network adapters on the nodes. Remember that you need two adapters on each node: one for heartbeat and another for connecting to the other servers. The network adapter used for heartbeat need to be in a private network address group, such as in the 10.0.0.0 network , because it should not have communication link with other network groups.
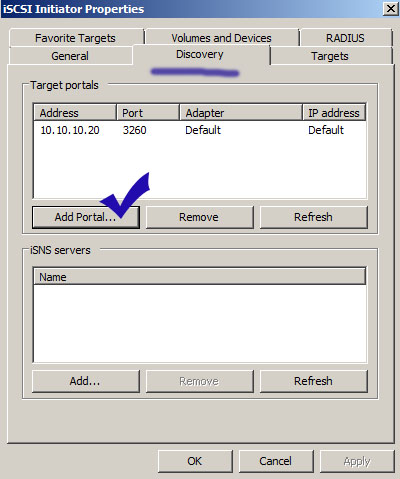
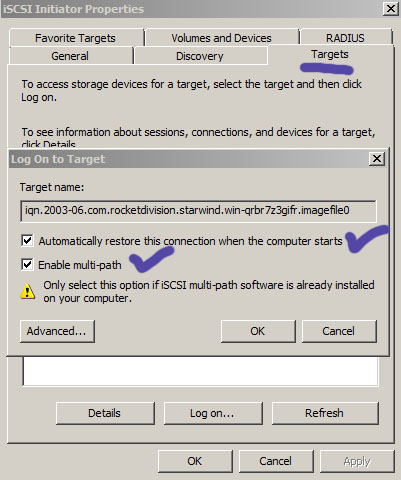
Finally, add the iSCSI initiator in all the nodes. To start iSCSI initiator, go to the administrative tools and click on “iSCSI initiator”. Click “Yes” to start the iSCSI process, if it is not running. Next, click on ‘discovery’ on the iSCSI initiator properties and click on “add pool”. Type the IP address of the iSCSI host or storage server. Next on the target, check that whether the storage hosts address is active. Then, click on the name of the host under “targets” and click on the “log on” and select the then select “automatically restore…” and “enable multi-path”.
This iSCSI initiator is a driver that will pass the storage traffic from your nodes to the storage server via Ethernet network using the network adapter installed in your computer.
Storage server configuration
The storage server need not to be a domain member. Therefore, you do not have to create any user account for this server in the active directory. Any standalone server can work as a storage server. Remember that the IP address of the storage server has to be in the same IP class of the cluster nodes.
Creating the cluster
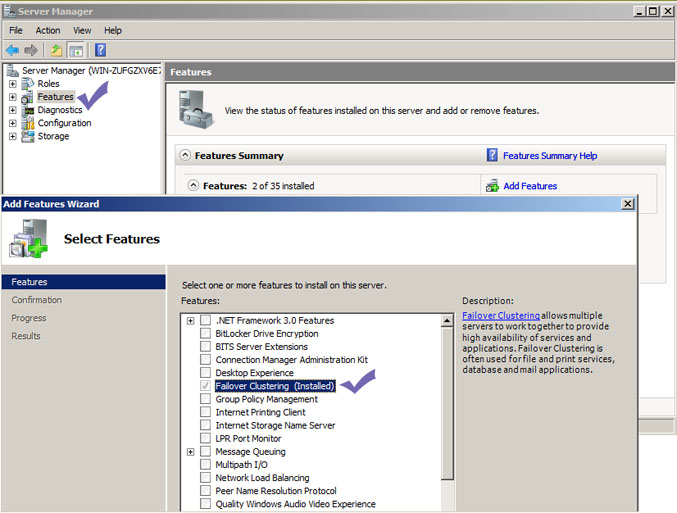
Login to the node with your clusteradmin account that you created in the active directory and added to your local administrators group in the nodes. Firstly, add the failover cluster server features to your nodes. To do so, go to server manager and the click on “features”. Next, click on failover cluster and then click next to start the installation. You need to add the clusters features in all the nodes that will join your cluster.
Once you have installed the failover cluster features in all the nodes, you are ready to start building the cluster. To create cluster, log on to any node with clusteradmin account as a domain user and then click on “failover cluster management”. Before creating the cluster, you can use the cluster validation tool to check that if all the nodes are ready to join the cluster.
Next, open the “failover cluster management “from the administrative tools and then click on “validate a configuration wizard”. Then, click on “browse” and type the computer names or node names that you want to make part of the cluster. Select the number of computers that you want to join in the cluster. Finally, click next and wait a few minutes to get the report. Once you are satisfied with the report click on the “create a cluster”, which is on the right side of the failover cluster management tool, and click ‘Next’. 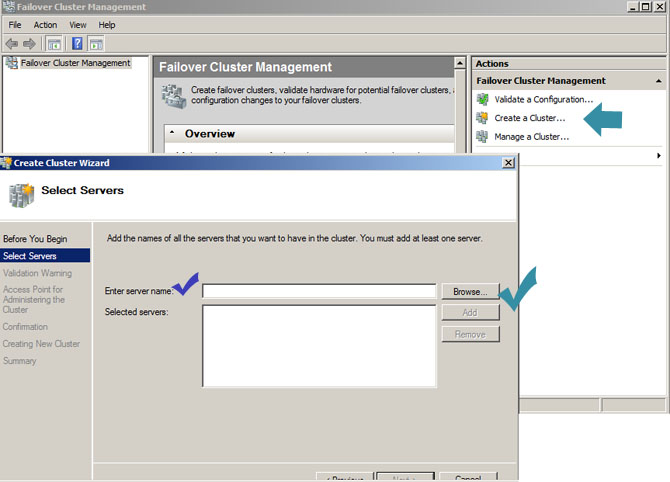
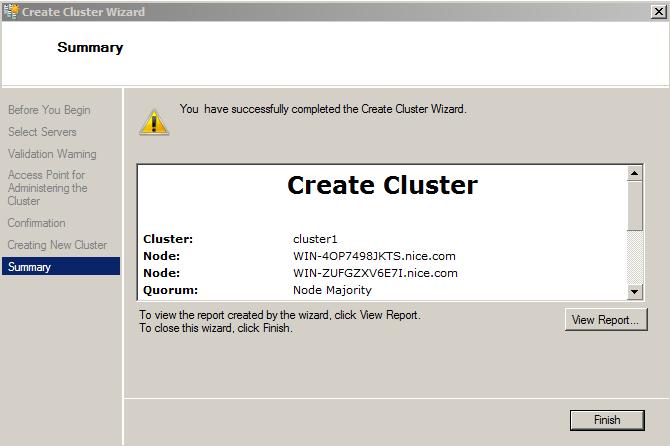
After that click on ‘browse’ and type the name of the computer that you want to add in your cluster. You do not need to type the full name of the computer, if you type a first few letters of your computer name and click on the “check names”, you will see a list of computer names in our network. Now select the names that will be part of your cluster, and click ‘OK’ and then ‘OK’ again. Click ‘Next’. If you already have done the validation test, no need to select the “No, I do not need ….” After that type a name for your cluster—it can be any name that you want to give to your cluster. For example, you want your cluster to be known as cluster1, then type it in the “Cluster name” field and then give an IP address that you want to give to your cluster—this IP should be in the same network of the nodes of the cluster. The cluster IP is a virtual IP that the end-users will see to access your service. Click ‘Next’ and ‘next’ again. Wait a few minutes until you see the message that you have successfully created the cluster. Finally, you can check the status of your cluster form the “failover cluster management” tool.
Important things to remember about the failover cluster
- Both servers must be in a domain. It recommended that both the servers be member server of the domain.
- Install the failover server feature from the server manager
- Cluster will work only in Windows enterprise and datacenter edition.
- Assign the static IP to your cluster servers, do not use IP assigned by DHCP.
- Make sure that iSCSI service is running. To check if it is running, you need to go to administrative tools an then click on “iSCSI initiator”. The initiator is a driver that connects the server with the iSCSI storage devices over Ethernet network.
