After packaging the helm charts, you need to store it in a repository so that it can be easily deployed using helm in the Kubernetes or Minikube. This post aims to show you how to set up the AWS S3 bucket as a Helm chart repository. Using the steps below you will be able to setup Helm S3 repo for both Minikube and KOPs created cluster hosted in AWS.
Scenario: we will create the environment on a local computer, where we have installed Minikube using a virtual box. We have created another VirtualBox for Jenkins running on Ubuntu. An easy and alternative approach is to install Jenkins using the Helm chart in the Minikube. To replicate the production environment, I have decided to install Jenkins outside of the Kubernetes environment. The reason for why I want to keep Jenkins outside of the Kubernetes cluster is to make sure the Kubernetes cluster issue does not affect the Jenkins pipelines that we use to deploy codes in other environments.
Jenkins server VM needs to run on the same network where you have installed Minikube. In my case, my Jenkins has two network adapter- one is NAT and another one is host-only. Make sure you attach the same host-only adapter that you have attached to the Minikube.
Assuming that you have already installed Minikube and Jenkins( running on a separate VM).
Step 1: Create a docker image with Kubectl, Helm 3 and S3 plugin
Step 2: Setup Jenkins and Kubernetes Plugin
Step 3: Setup AWS credential in Jenkins
Step 4: AWS S3 bucket and policy
Step 5: Jenkins file creation
Step 6: Test
- create a docker image for Jenkins
This docker image will be used as a base image for Jenkins in order to create pods to deploy the helm charts. After deploying the chart, this pod will be auto-destroyed. Use the following docker file to create your image or use a docker image that has already Kubectl, Helm 3, and S3 plugin installed.
- install Jenkins in ubuntu
sudo apt update
sudo apt install openjdk-8-jdk
wget -q -O - https://pkg.jenkins.io/debian/jenkins.io.key | sudo apt-key add –
sudo sh -c 'echo deb http://pkg.jenkins.io/debian-stable binary/ > /etc/apt/sources.list.d/jenkins.list'
sudo apt update
sudo apt install jenkins
systemctl status jenkins
sudo ufw status
If the firewall status is active run:
sudo ufw allow 8080
Jenkins admin password:
sudo cat /var/lib/jenkins/secrets/initialAdminPassword
Jenkins dashboard URL:
http://your_virutal_host _ip :8080
ref: https://linuxize.com/post/how-to-install-jenkins-on-ubuntu-18-04/
Kubernetes Jenkins plugin
Install the Kubernetes plugin.
Kubernetes Plugin link: https://plugins.jenkins.io/kubernetes-cd/
Once you are done with installing Jenkins, you need to install the Kubernetes plugin. After installing the plugin you need to set up the credentials and some other settings so that Jenkins can communicate with the Kubernetes.
At first, create a service account called Jenkins-helm in the Minikube. copy the lines below and paste it to a file called serviceaccount.yaml.
|
apiVersion: v1 kind: ServiceAccount metadata: name: jenkins-helm — apiVersion: rbac.authorization.k8s.io/v1 kind: ClusterRoleBinding metadata: name: jenkins-helm roleRef: apiGroup: rbac.authorization.k8s.io kind: ClusterRole name: cluster-admin subjects: – kind: ServiceAccount name: jenkins-helm namespace: default |
Create a service account by running:
kubectl create -f serviceaccount.yaml
To check if the account has been created properly use the command below:
- kubectl get serviceaccounts
- kubectl get serviceaccounts/jenkins -o yaml
If you need to delete the service acccount:
kubectl delete serviceaccounts jenkins-helm
To get the service account token , paste the code below:
kubectl get secret $(kubectl get sa jenkins-helm -n default -o jsonpath={.secrets[0].name}) -n default -o jsonpath={.data.token} | base64 –decode
Note: The output of the above token will set as credentials in the Kubernetes plugin.
To get the certificate of the account type the command below.
kubectl get secret $(kubectl get sa jenkins-helm -n default -o jsonpath={.secrets[0].name}) -n default -o jsonpath={.data.'ca\.crt'} | base64 --decode
Note: the output of the above command will be set as “ Kubernetes server certificate key” in the Kubernetes plugin.
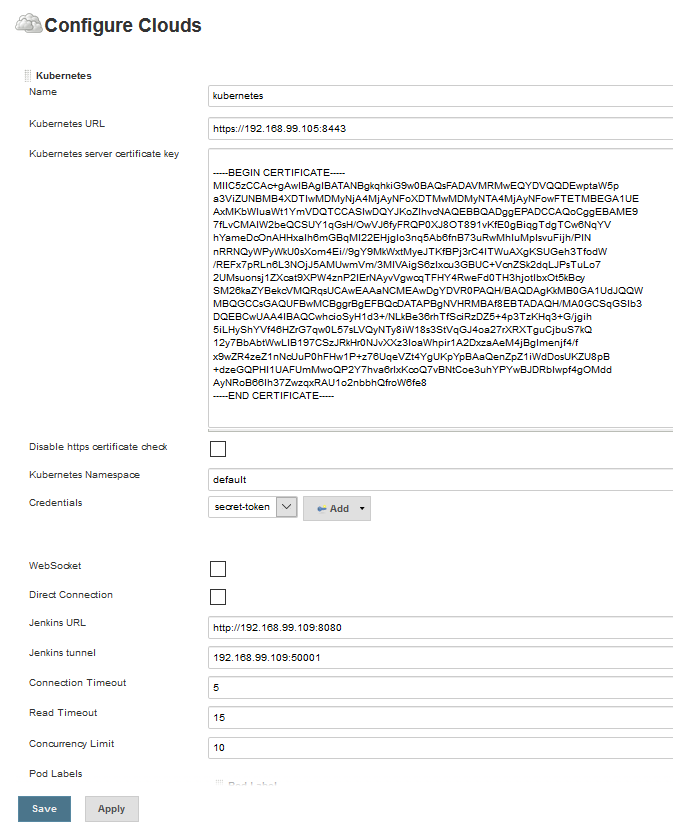
Go to “Manage Jenkins” and then click on the cloud and set the Kubernetes plugin credentials and the service account certificate.
Have a look at the Jenkins Kubernetes plugin config. Make sure you have set up the correct Jenkins tunnel URL. I have configured a custom port in the Jenkins config file. That’s why I used port 50001.
To check the Jenkins Tunnel Port in the Ubuntu, go to “cat /var/lib/jenkins/config.xml” and the check the tunnel port number in the following line:
<jenkinsTunnel>192.168.99.109:50001</jenkinsTunnel>
Note: by default Jenkins uses port 5555 for the tunnel.
Kubernetes Plugin link: https://plugins.jenkins.io/kubernetes-cd/
- Setup AWS credentials in Jenkins.
Make sure you have installed AWS Global Configuration Plugin in Jenkins. Go to “Manage Jenkins Plugin” and then click on AWS and set up the credentials and give it a name. later in the post in step 5, you will see the in the Jenkins file, I set the AWS credentials reference called “aws-cred”. This name will be used in the Jenkins pipeline as a reference.
4.. AWS S3 bucket and bucket policy
Create a S3 bucket in AWS and configure the access policy allowing the IAM user- the IAM users credential setup in the Jenkins- to write on this bucket.
5.Jenkins file creation
|
pipeline { agent { kubernetes { label ‘helm-pod’ containerTemplate { name ‘helm’ image ‘sixthgalaxy/helm3’ ttyEnabled true command ‘cat’ } } } stages { stage(‘Run helm’) { steps { withCredentials([[ $class: ‘AmazonWebServicesCredentialsBinding’, credentialsId: ‘aws-cred’, accessKeyVariable: ‘AWS_ACCESS_KEY_ID’, secretKeyVariable: ‘AWS_SECRET_ACCESS_KEY’ ]]) {
container(‘helm’) { git url: ‘git://github.com/test/test.git’, branch: ‘master’ sh ”’ HELM_BUCKET=my-bucket-name PACKAGE=demo-chart export AWS_REGION=eu-west-1 echo “directory change!” cp -r /usr/local/bin/helm ~ sleep 10 echo ” Waiting now!” helm s3 init s3://helm-minikube/charts echo ” S3 init completed!” helm repo add my-charts s3://${HELM_BUCKET}/charts sleep 10 echo ” Chart repo Added!” cd helm/${PACKAGE} helm dependency update helm package . helm s3 push –force ${PACKAGE}-*.tgz my-charts ”’ } } } } } } |
Minikube time setting
The chart upload to the bucket may fail due to the following error:
upload index to s3: upload index to S3 bucket: RequestTimeTooSkewed: The difference between the request time and the current time is too large
Solution:
From the command prompt, type “minikube ssh”
curl http://s3.amazonaws.com -v
Take a note of the time and set it using the date command as show below.
date +%T -s "11:14:00"
$ date -u
Finally, run the pipeline and test if the Helm chart has been uploaded into the S3 bucket.
