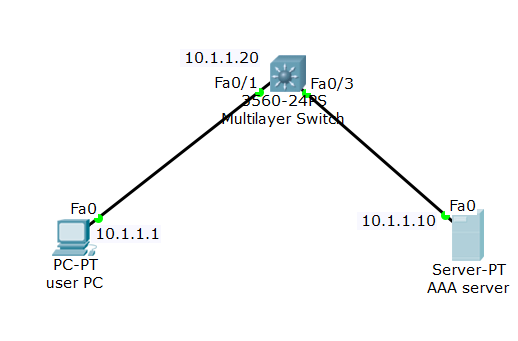
AAA functionality in Cisco switch can be used as a centralized solution to secure and control user access to switches. Cisco switches are capable of implementing AAA functionality with either TACACS+ protocol (Cisco proprietary) or RADIUS protocol. To use AAA you need to enable it and then connect it to an AAA service hosted in a server.
The following are the three generic steps:
- Enable AAA
- Define AAA authentication protocol
- Define AAA server host IP and set secret key which will be shared between the switch and the AAA server.
- Assign the authentication in the VTY line so that when users try to Telnet/SSH to the switch, they are challenged for a username and password.

Authentication configuration
Switch(config)# aaa new-model
Switch(config)# username cisco password cisco
Note: this is a username and password setup on the switch’s local database. You need to configure username and password on the AAA as well, which can be different than the local username and password.
Switch(config)# enable password mycisco
Switch(config)# aaa authentication login myauth group tacacs+ local
Note: when TACACS server becomes unreachable, you use switch’s local database for authentication.
Switch(config)# tacacs-server host 10.1.1.10 key mykey
Note: the key string ‘mykey’ will be used to encrypt the session the key ‘mykey’ should only be known to the server and the switch.
Switch(config)# interface Vlan1
Switch(config-if)# ip address 10.1.1.20 255.0.0.0
Switch(config-if)# exit
Switch(config)# line vty 0 4
Switch(config-line )# login authentication myauth
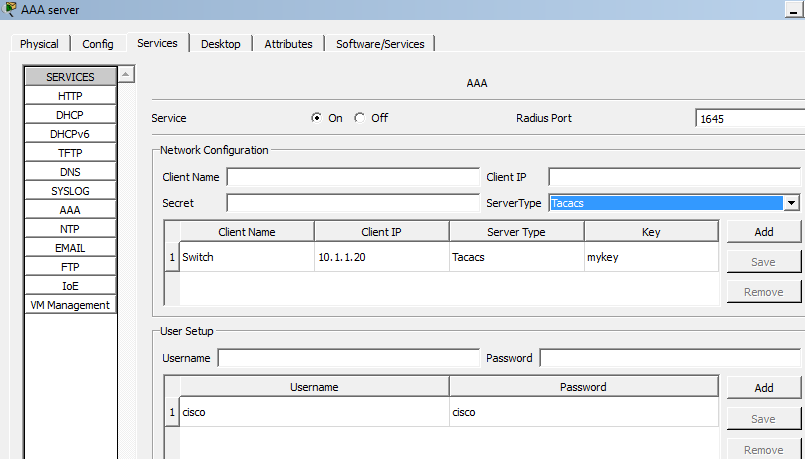
On the packet tracer, you need to add a generic server to the switch and set the IP to 10.1.1.10. Next click on the server icon and click on service and then click on AAA tab. Make sure service state is selected as ‘on’ as shown below screenshot.

Under the network section, type the client name, which will be the name of your switch? Next set the client IP. Here your switch is the client to the AAA server. The IP of VLAN1 is the client IP. Finally, select the server type as tacacs and click on add button.
In the user setup section, type a username and password and click on add. Remember that when you telnet or SSH to the switch, use this username and password, which will be verified by the AAA server.
Authorization configuration
This configuration will define what you can do once you get onto the switch after a successful authentication. When you configure authorization in cisco switch, it always queries the AAA server (RADIUS or TACACS+ server)
Switch(config)# aaa authorization exec default group tacacs+
Note: the above command will determine whether a user is allowed to EXEC mode. If you need to configure command level, network level or any other level of authorization, you need to replace the ‘exec’ by the appropriated command.
After defining the authorization, you need to apply the authorization to a line so that the users get authorized to specific task by the AAA sever every time they logon to the switch using that specific line. But the packet tracer 7 does not have any option to apply authorization to a specific line. So, you can use the following command to allow the switch to use AAA authorization for all lines.
Switch(config)#aaa authorization exec default group tacacs+ local
Packet tracer 7 allows to debug authentication process. To enable type the following command on EXEC mode
Switch# debug aaa authentication
