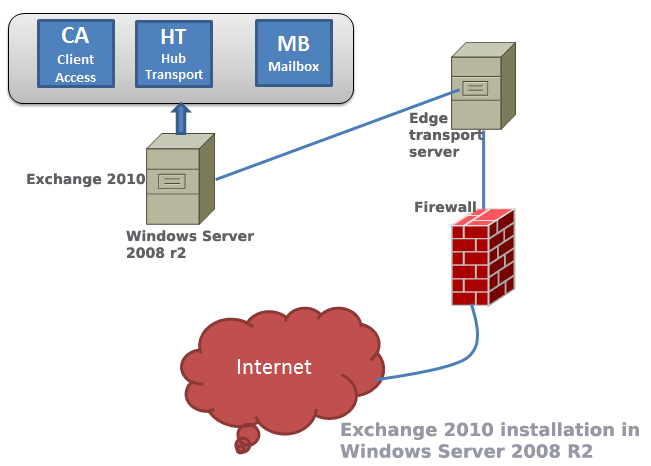
Among all Microsoft’s solution Exchange is considered a bit tough to master in. But your learning curve will be much more smoother if you follow a few simple steps described in the following paragraphs.
Before starting to install exchange, you always need to prepare the schema and domain. Also, you need to install a few mandatory services and features. Make sure you server meet the hardware requirements and OS requirements.Take into account of the following four during the installation planning phase.
- Choose the appropriate Windows server version for exchange.
- Prepare schema and domain
- Server hardware requirement
- Choose the roles you want to install
Which windows serve should I use for exchange 2010
- Windows server 2008 with SP2
- Windows server 2008 R2
Preparing the server
At first, join the server to your main as a member server.
Go to the location where you have copied the exchange installation file. For example, all of your exchange files are in a folder called exchange1 in C drive. Go to that location in the command prompt.
C:\ cd exchange1
C:\exchange1\
If it is your first exchange installation in your Active directory domain, then you have to prepare you active directory and the domain for exchange installation.
To prepare AD for exchange use the command:
C:\exchange1> Setup /PrepareAD /OrganizationName: mydomin
Note: mydomain is the name of your domain.
Next, prepare your domains. Use the following command in your command prompt.
C:\exchange1> Setup /PrepareAllDomains
The above command will prepare all the domains for exchange server installation in windows 2012. Alternatively, you can specify a specific domain name, but if you prepare all the domains you do not have to prepare your domains the next time you install another exchange server in your network. Besides, preparing all the domains will not cause you any trouble. Therefore, it is better to prepare all the domains when you install the first exchange server in your forest.
Note: if you are planning to install the unified messaging role in you require having desktop experience features.
For installation in Windows 2008 r2
- The server where you will install the hub transport and mailbox role will need to have filter pack installed.
- In the power shell type “Import-Module ServerManager.”
- Use the Add-WindowsFeature cmdlet
- Set TCP port server to automatic. To make it automatic, open services and then select NetTCPPportSharing and make it automatic.
Detailed Steps
- Install filter pack
- Open PowerShell. Type “import-module ServerManager”
- In the power shell type “Add-WindowsFeature” and then type the following lines (these codes will add the required features for exchange 2010).
NET-Framework,RSAT-ADDS,Web-Server,Web-Basic-Auth,Web-Windows-Auth,Web-Metabase,Web-Net-Ext, Web-Lgcy-Mgmt-Console, WAS-Process-Model,RSAT-Web-Server, Web-ISAPI-Ext, Web-Digest-Auth,Web-Dyn-Compression, NET-HTTP-Activation,RPC-Over-HTTP-Proxy, Desktop-Experience –Restart
After adding these features, the server will restart automatically.
- Open the folder where you stored Exchange 2010 setup files. Double click on setup.exe.
- Choose exchange language option. Select “install only the language from the DVD.”
- Click on ‘Next’ and ‘Accept’ and ‘Next.’
- Click ‘Yes’ or ‘No’ to the error reporting. If you want the errors in the exchange server to be reported to Microsoft then click ‘Yes.’
- Choose ‘custom’ exchange server installation.
- You may install hub transport (HT), Mailbox (MB), ClientAccess (CA) and Unified Messaging (UM) roles in a single server. And if you want to install edge transport role, you need to install it in a standalone server that is not part of the domain. Remember that edge transport server cannot be installed in a server with other roles. For example, you want to install the mailbox, client access, hub transport and unified messaging roles, then select all these four roles and click Next.
- In client setting, click ‘No.’
- Client access server role will be Internet facing. Type mail.yourdomain.com. Make sure that the public DNS pointing to this server’s IP.
- Let the installation process check that if your server meets all the requirements for exchange server. Click Install and then click Finish to the installation process.
Points to remember:
- Exchange server 2010 is not compatible with Windows server 2012 r2. You need to have exchange 2013 for windows server 2012 r2.
- It is not recommended to install exchange server in a server hosting Active directory. You should consider installing Exchange in separate server that is part of the domain.
- When you prepare the server for exchange using the Setup command (as shown at the beginning of this post), you need to run those command in the site or in the DC (domain controller) that is the schema master.
After installation, you need to configure the exchange so as your active directory users can start using mail server within the internal network. To send mail to the Internet, you have to configure the either the hub transport or the edge transport server, depending on your deployment strategy and design. But remember that you must set up an mx record in the public DNS if you want to send and receive mail from the outside world. Besides, you have to a create a send connector in your hub transport server and allow your firewall for SMTP traffic.

