At times, it is economical to build a VPN tunnel with the available networking resources. For example, if you have a VPN concentrator and you need to connect a small office securely with your network, you can do so by installing a low priced Cisco router in the remote office. This post will demonstrate how you can build VPN using a VPN concentrator and a Cisco router.
There are a few things you need to remember:
- Your VPN will start passing information through the tunnel only when a host from the remote part of the VPN will send traffic to your concentrator. So, to see the encrypting traffic following back and forth the tunnel, send some traffic from a host connected to your router to the VPN concentrator.
- Make sure your router has the license to use crypto commands, which means that it is capable of creating VPN tunnel.
To build the tunnel you have to configure the router and use the exact same crypto configuration in the concentrator. At first we will configure the router. You can follow the following five simple steps to configure VPN in your router.
- Creating an ISAKMP policy
- Configure the IPSec parameters
- Access list
- Create a crypto map
- Apply the crypto map in an interface
Step 1: ISAKMP policy
This is used to identify and to negotiate between the two devices that will be part of the VPN. Following are the command used to build ISAKMP policy:
router(config)# crypto isakmp enable
router(config)# crypto isakemp policy 10
router(config-isakmp)# crypto aes 128
router(config)# hash sha
router(config)#authentication pre-share
router(config)#group 2
router(config)#lifetime 86400
After confiruing your policy, verify it in the outer using the following command:
show crypto isakmp policy
Step 2: IPSec Parameters
router(config)#crypto ipsec-transform-set myvpnsetesp-aes 128 esp-md5-hmac
router(config)#mode tunnel
router(config)#crypto ipsec security-association lifetime seconds 28800
Step 3: Access list
This access list is used to specify who will be allowed to use the tunnel. If you have a number of networks connected to your router and you want to allow all of them to use the VPN tunnel then you need to create access list for each of them separately. You must include the source and the destination network address in your list. The local network connected to the route is considered as source and the remote network, the network connected to the concentrator, will be considered as destination network. For example, the network 10.0.0.0 is connected to your router and you want it to communicate with the 20.0.0.0 network connected with the VPN concentrator.
Router(config)# access-list 100 permit ip 10.0.0.0 0.255.255.255 20.0.0.0 0.255.255.255
Step 4: Crypto Map
A crypto map is a template that contains the ISAKMP policy and IPSec parameters of the tunnel. After creating the ISAKMP policy and the IPSec parameters in the step 1 and step 2, you need to associate them with a map. The only purpose of creating map is to apply it in an interface.
Router(config)#crypto map mymap 10 ipsec-isakmp
Router(config)#set peer 191.1.1.1
Router(config)#set transform-set myvpnset
Router(config)#match address 100
Router(config)#set pfs group 2
Applying the crypto map in an interface:
Router(config)# interface fastethernet 1
Router(config)#crypto map myvpnmap ( choose any name you want)
Configure the VPN concentrator
Before start configuring the VPN parameters in the concentrator, you need to add default gateway and tunnel default gateway. The tunnel default gateway is the concentrator’s internal interface IP that will be connected to the internal network. By the term “default gateway” we mean the public IP of the concentrator, which will be connected to the Internet. If your concentrator is already configured with tunnel default gateway and default gateway, you do not have to do configure anything else.
Add the network address
You have to add both the local and the remote( router side) network address in the concentrator. This process is equivalent to creating the access list in the router in order to specify the source and destination network of the VPN.
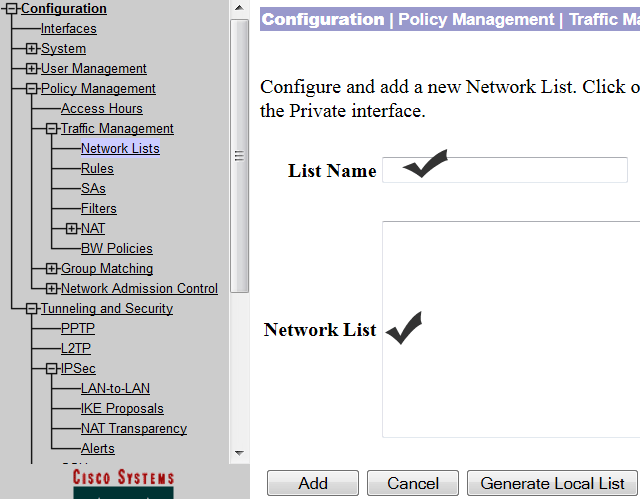
To add the network address, click on ‘Configuration’ and then click on “Policy Management”. Next select traffic management and click on “network list”. To add the network address, click on ‘ADD’ and then name it and type the local network address as shown in the screen shot below:
After adding the local network address, you need to add the remote network address using the same procedures that you used to add the local network address.
Set IPSec Parameters
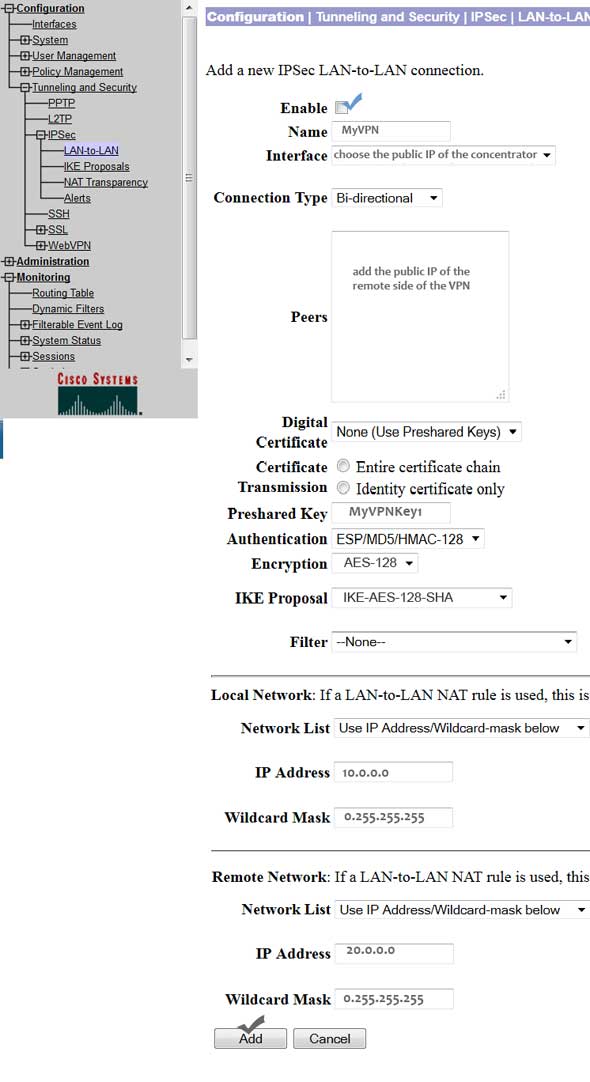
To configure the IPSec parameters for the VPN, you need use the same authentication and encryption parameters that you used in the router. To start configuration, select ‘Configuration’ and the click on ‘System’. Next, click on “Tunneling Protocols” and “IPSec LAN-to-LAN.” Finally, click ‘ADD.’
Make sure you have ticked the ‘Enable’. Next, type a name for your configuration. Then select the public IP for the ‘Interface’ option. Choose connection type as ‘bidirectional.’
The peer IP will be the public IP of the router. Since we are not using any digital certificate for this configuration, we will select ‘none.’ Type the pre-shared key name-it will be the same key name that you choose for the router. Then select the authentication and the encryption, both of these parameters should match with the ones that you choose in the transform set in the router.
Select an ISAKMP proposal, which should match the ISAKMP proposal crated in the router.
Finally, add both the local and remote networks and click ‘ADD.’
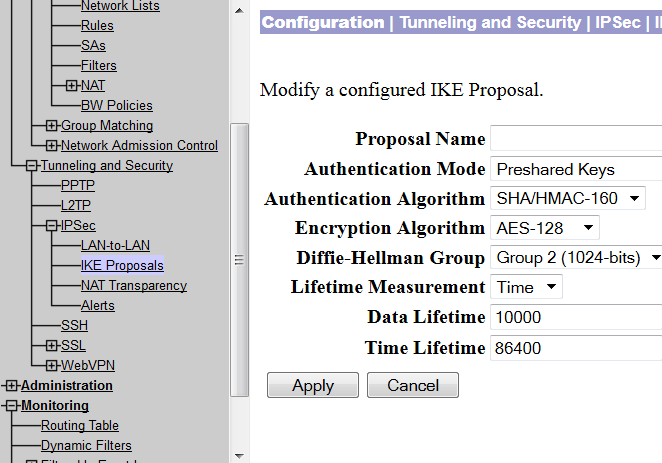
This will end the concentration configuration. If you want to either view or modify any parameters of this configuration, you can do so by clicking ‘Configuration’ and then select ‘System’. Next, click on “Tunnel Protocols” and the click “IPSec LAN-to-LAN. For the list select your VPN connection and the click on modify.
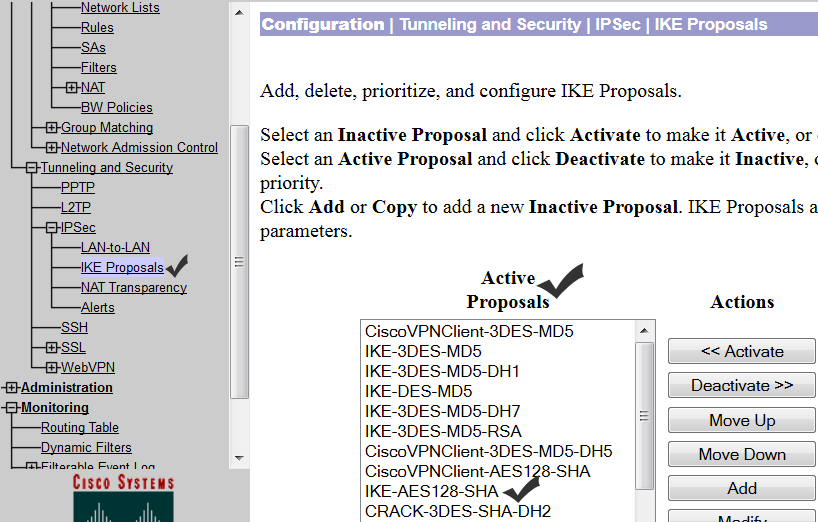
To check whether the ISAKMP policy is selected as action or action, you need to click on ‘Configuration’ and then select ‘System’.Next, click on “Tunnel Protocols” and select “IPSec” and click on “IKE proposals.”
Check if your IKE proposal is in active state. If it is inactive, just select it and click ‘Activate.’
The default Security association parameters of IKE and IPsec can be checked by selecting Configuration>Policy Management > Traffic Management > Security Association.


