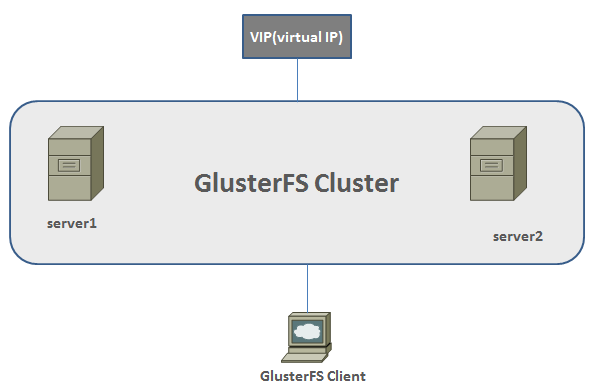
Scenario- this post aims to help you build a high availability cluster for websites using GlusterFS on Debian server.
In this installation there will two servers-forming a cluster for web contents- that will replicate each other and the third one will be a client server. If you want to add anything in the cluster you have to add it in the client machine, which will be replicated to both the cluster nodes.
At first, you have to install three Debian servers in VMs (virtual machines) or in any physical server and write down their IP.
Server1 IP: 192.168.83.130
Server2 IP: 192.168.83.131
Client server IP: 192.168.83.132

Step1: add the host information
Add the following info in each of the three servers:
# nano /etc/hosts
127.0.0.1 localhost
127.0.1.1 server1.mydomain.com server1
192.168.83.130 server1.mydomain.com server1
192.168.83.131 server2.mydomain.com server2
192.168.83.132 client.mydomain.com client
Make sure the last three lines of the above information are same in the three servers and replace the “mydomain” by your domain name.
Step 2: Install GlusterFS
# apt-get update
# apt-get update && apt-get install -y glusterfs-server
# glusterfsd –version
Step 3: Create a directory which will be exported through GlusterFS:
As we are going build to make high availability web server, we need to make sure apache server is already installed. You can skip the following command if you have already installed apache in your server.
# apt-get install -y apache2
Next, create a directory to host your web contents
Run on both the server
# mkdir /var/www/test
Note: GlusterFS will store all data or website contents in this ‘test’ directory. If you want to use a separate partition to keep your data then you can mount that partition to this directory. But to keep our configuration simple, we will the test mounting a partition to it.
Step 4: Create trusted storage pool
On the server1 run the following command to create a storage pool. Remember that it does not matter if you are running this command from server1 or server2 because the configuration will be replicated automatically to another server. To get your fully qualified domain name use the command “hostname –f” and remember to replace the server2.mydomain.com by your domain name in the following command.
# gluster peer probe server2.mydomain.com
Next, check the status of the newly created trusted storage pool
# gluster peer status
Step 5: Create a share directory
Now we want to create a share called ‘html’ where we will store website contents and this directory will be in sync mode in both server1 and server2. Run the following command in the server 1, which will create the ‘html’ directory inside test directory in both the server. You can run it from either server1 or server2- the result will be the same.
#gluster volume create html replica 2 transport tcp server1.mydomain.com:/var/www/test/html
server2.mydomain.com:/var/www/test/html force
# gluster volume start html
Next, use netstat command as shown below to check if TCP connections have been established between the servers.
#netstat -tap | grep glusterfsd
If you don’t see any results, restart the GlusterFS service.
#service glusterfs-server restart
To check the information about the shared volume run:
#gluster volume info
Step 6: Client machine configuration
This is the final stage of configuring GlusterFS automatic file replication system for websites.
At first, you have to allow the client IP to connect to the clusters. If you want to allow all clients, you do not have to do anything. But it is better to restrict the client access for security and accountability. Run the following command to allow your client machine IP.
# gluster volume set html auth.allow 192.168.83.132
To install GlusterFS client package run the followings:
# wget -O – http://download.gluster.org/pub/gluster/glusterfs/3.7/3.7.9/rsa.pub | apt-key add –
# echo deb http://download.gluster.org/pub/gluster/glusterfs/3.7/3.7.9/Debian/jessie/apt jessie main > /etc/apt/sources.list.d/gluster.list
#apt-get update
#apt-get -y install glusterfs-client
#mkdir /mnt/glusterfs
#mount.glusterfs server1.example.com:/html /mnt/glusterfs
Note: instead running mount command in the server1, you can run it on server2.
On the client machine create a symbolic link to connect the mounted directory to the web directory so as when you change anything in the website contents it get replicated to the GlusterFS cluster servers.
# ln -s /mnt/glusterfs /var/www/test
Now, inside the test directory a new directory named glusterFS will appear, and put r all web contents in this directory. When you finish uploading web contents in the GlusterFS you visit the /var/www/test/html directory on both server1 and server2 to verify if they have been replicated properly.
Now, you can point your load balancer to both server1 and serve2 to distribute traffic between the two nodes. For hosting a dynamic website that needs a database, you can create a separate database server or can host your database in the server1 and server1 clusters. Remember that this post does not include the configuration that needed database resiliency-thus making is suitable for configuring resilient web servers that host static contents. The only purpose of client of server here was to update contents and making changes to the website.
